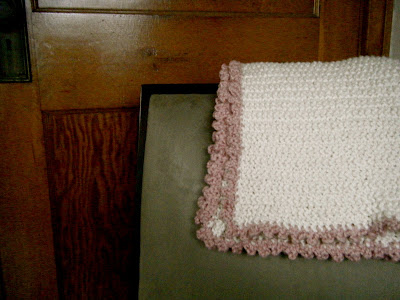
 Last week I became an aunt again for the fourth time. My sister, the only one out of all of us girls (there are four of us) who has kids, had her fourth child on October 7, 2009. Little Elizabeth came one day early but the family happily welcomed her, as did her two big sisters and brother. I have not seen her yet as they live in the Vancouver area but Mr. T and I are so delighted and have plans on heading out West in the coming months.
I casted on for this blanket, not really knowing how it would turn out. I wanted a basic blanket that was cushy and had no large holes in it that little fingers could get caught in. What came about was the Elizabeth Blanket, a nice, pebbly stitch with a crochet picot edge, just enough girly pinkness for a fourth child (I know, I am a fourth child!).
Here is the pattern that I've written up. This is my first pattern so please bear with me. If you find any mistakes or would like to give me some advice on proper pattern writing, I would welcome your comments. Feel free to modify this pattern for a smaller/larger blanket.
 Elizabeth Blanket
Crochet Hook: Size 9 (5.5 mm)
Yarn: MC - 6 balls Lion Brand Nature’s Choice Organic Cotton in “Almond”
CC - 1 ball Lion Brand Nature’s Choice Organic Cotton in “Strawberry”
This yarn is classified as "Medium" or worsted-weight.
Gauge: doesn’t matter too much since this is a blanket
Finished size: Approximately 50 inches X 30 inches
Row 1: *k2, p2*, repeat from * to * until end of row
Row 2: *k2, p2”, repeat from * to * until end of row
Essentially you will knit the purl stitches and purl the knit stitches until all 6 balls of MC are used up. Be sure to save enough yarn to bind off. Weave in loose ends.
Chain 3
Work a single crochet into the first chain.
Work a single crochet into each of the next 2 “stitches” or holes.
Using the last single crochet that you did, chain 3 and repeat (single crochet into first chain, single crochet, single crochet, chain 3, etc.).


7 comments:
Congratulations on being an auntie 4th time around! That blanket is sweet and pretty. I like that you've used organic cotton too. Thanks for the pattern! -me@salihan.com
Lovely, congrats to you.
The only detail I would add to the pattern is letting folks know the weight of the yarn should they want to make substitutions.
Congrats Auntie T! Have fun in Vancouver when you make it out there.
Fabulous news T. I'm an Aunty three times (one year apart) - that means knitting everything in threes! Hope your nieces are more spread out than mine!
Lovely blankie :-)
Fabulous News T! Great blanket!
Post a Comment